Node graph
The look, built as nodes.
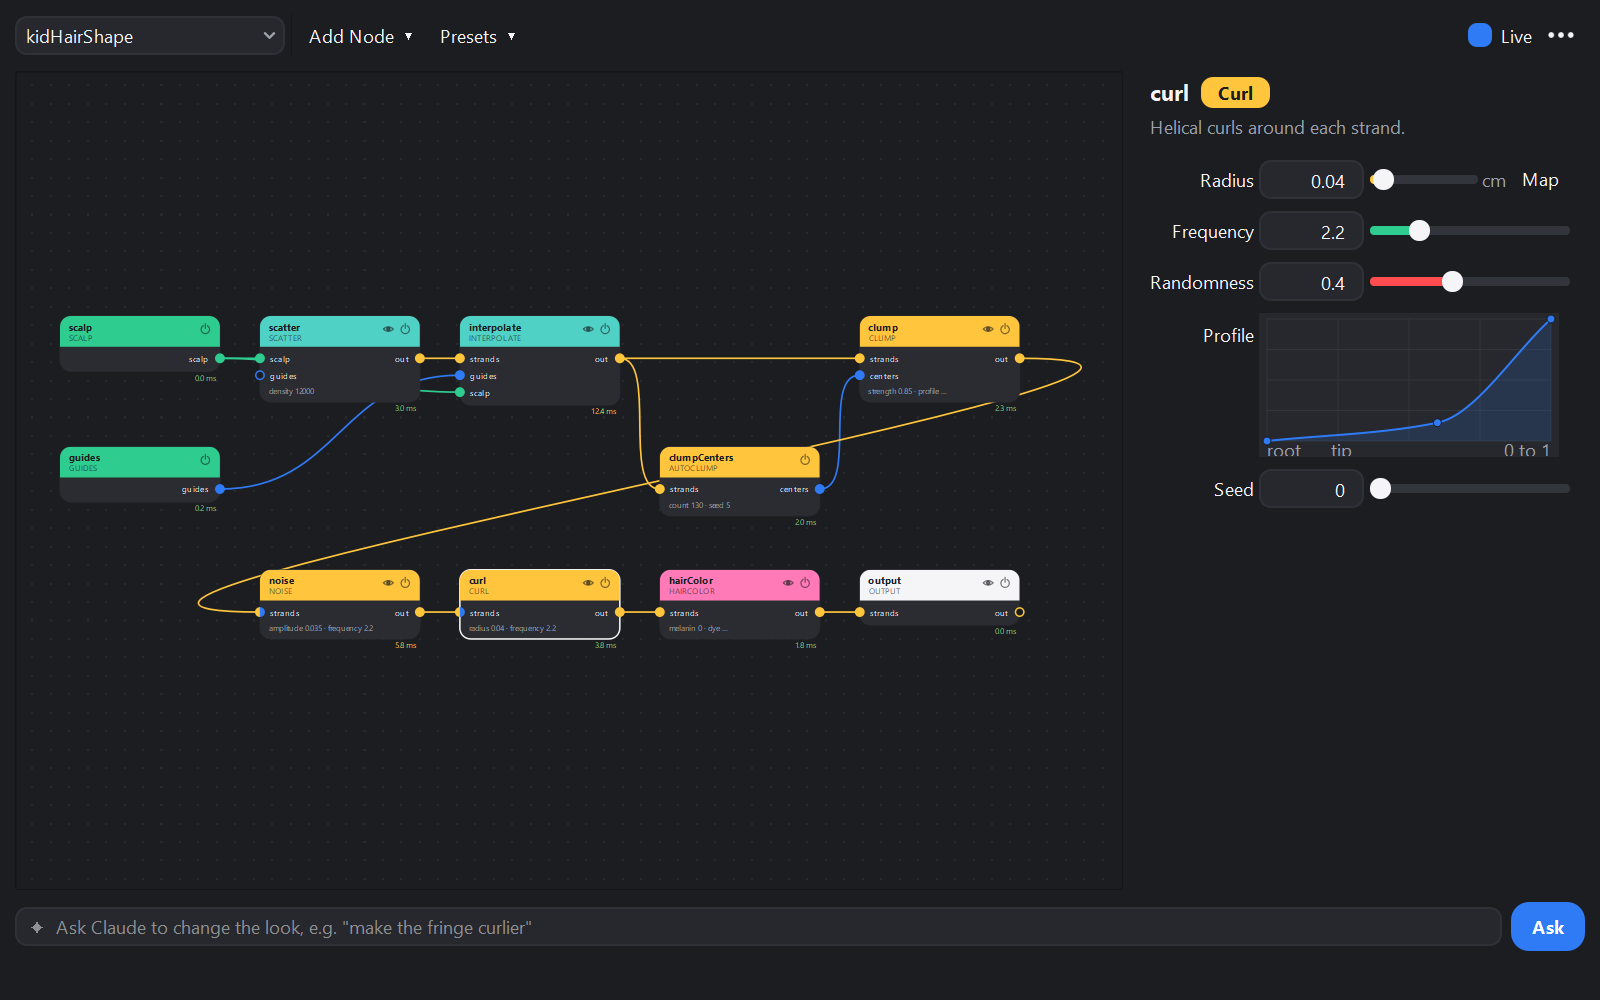
How it works
Strands flow from the scalp through the graph to the Output. Scatter places roots, Interpolate shapes them from the guides, and look nodes go between Interpolate and Length.
- Add Node inserts after the selected node; Tab or right-click the canvas searches by name or by what a node does.
- Wire by dragging from an output port to an input. Compatible ports light up; mismatched types and cycles are refused, with the reason in the status bar.
- Live applies each edit as one undo step. Sliders update the groom while you drag.
- V views a node in the viewport; B bypasses it for a with/without comparison.
- Ramps (profiles along the length) get a curve editor.
- Real units: lengths in cm, widths in µm, density per cm² (... > Units).
Node categories
| Category | Nodes | What for |
|---|---|---|
| Sources | Scalp, Guides, ImportCurves, ColliderMesh | Where strands and guides come from. |
| Grow | Scatter, Interpolate, Cull | Place roots, shape them from the guides, thin them. |
| Shape | Length, Width, Resample, Comb, Lift, Flow, Part, Smooth, BlendNeighbors, Gravity, Displace, Mirror, Collide, RestoreLength | Length, thickness, direction, weight, symmetry and collisions. |
| Look | AutoClump, Clump, Twist, Braid, Noise, Curl, Flyaway, Tangle, Instance | Clumps, locks, braids, frizz, curls and strays; meshes on the strands, and scales. A negative Clump strength parts the strands around its centers instead (fur around whiskers, horns, eyes). |
| Motion | Wind, Jiggle, Simulate | Movement without a cache; the guides simulated. |
| Color | HairColor | Pigment, dye, greys, tip color, painted color; bands, feather patterns, iridescence (Color patterns). |
| Feathers | Propagate, Split | Barbs grown off shafts, a downy base; assortments. |
| Convert | ToGuides, ToStrands | Turn strands into guides and back. |
| Fields & Curves | Map, Expression, Control, Field, FieldNoise, FieldRemap, FieldCombine, Curve | Drive any parameter from maps, formulas or sliders. |
| Utility | Attribute, Merge, Switch, Blend, Output | Channels, combining looks, variants. |
| Games | Cards | Game-ready hair cards. |
Smoothed scalps
When the render smooths the head (Arnold's Catclark subdivision) or you view it smoothed (Maya's 3 key), hair grown on the cage would float above or sink into the skin. The Scalp node's subdivision refines the scalp with the same Catmull-Clark rules: matchRender (the default) follows the mesh's Arnold iterations, else its smooth preview level; off keeps the mesh as it is; 1 to 3 set the levels. The node's note says what it found. Roots, guides, parts, flow, painted maps, collisions and simulation all use the smoothed surface, and groom files keep the level so farm renders and the standalone app match. ColliderMesh has the same param.
Interpolate follows the skin
Interpolate carries each guide's shape over the scalp to the strands around it, so hair combed back stays combed back all over a curved head, and a guide's shape comes round a fold or the rim of a thin flap the way the skin goes. With Follow surface (on by default) each guide also reaches only as far as it does along the scalp: guides behind an ear, across a fold or on the other side of a thin shell leave the hair just across it alone. On a smooth scalp the hair is the same either way.
Scales
Scales are rigid plates the strands lay out. The Instance node in mode scales puts one on
each strand's root, lying on the skin along the strand: as long as the strand, as wide as its
root (Length and Width size them, Comb, Flow and the guides point them, HairColor colors them).
- Plates:
prototypetakes the built-ingroomlab:scale(keeled),groomlab:scaleRoundandgroomlab:scaleShield, or your own mesh (1 unit long up +Y, its top up +Z). Several names mix them, at random or by a map (variantBy,variant). - Roof tiles:
tilelifts each tip by its plate's height over the next scale's base;lifttilts further;stackkeeps overlapping plates from flickering. - On the skin:
conformbends each plate over the body's curve, never inside it;offsetraises them. - Along the strand:
followstrandbends each plate along its strand's curve, its base on the skin: swept scales, spikes and quills that bend with the guides. Flat on the skin,aimrootpoints each by its strand's direction near the root instead of root to tip (tip, the default), for strands that curl back. - While grooming:
previewquads(orauto, past two million triangles) draws flat quads; renders always take the plates. The strands themselves stay hidden (showStrands). - Rendering: one mesh with
scaleColor,scaleRootColor,scaleId,scaleUVandscaleVariantas user data for any surface shader;materialnames its shading group.
The dragon_scales preset puts it together; scales_from_guides, scales_from_flow and
swept_spikes show guides, flow arrows and follow strand driving them. See Rendering.
Nodes with several outputs
Some nodes have more than one output port, down their right edge. Drag each link from the port you want:
- Map has
luminance,r,g,banda: one packed map can feed clumping from R, frizz from G and length from B. - Split routes strands to
a,b,candd, by share or by a painted map.
Mappable parameters
The Map button beside a value switches it to a texture, a color set, a strand attribute, an expression or a painted map. Right-click a parameter for Paint (see Painting maps) or Drive with Slider, which adds a Control node and a keyable attribute on the groom.
Blending two looks
Branch after Interpolate into two looks of the same strands and join them with a Blend node.
Its amount (0: a, 1: b) times its profile along the length moves the points and widths, and
mixes the color: give each branch its own HairColor and the strands blend from one color to
the other. Clump IDs and other channels stay a's. Set mix to shape to mix the shape
only. Drive amount with a slider or a painted map to animate or paint the mix.
Animating parameters
Key any number, switch, toggle, vector or color in place, as in Maya's Channel Box.
- Set Key: right-click a parameter > Set Key, or press S with the mouse over it. The
first key gives the parameter its own keyable attribute on the groom,
ctl_<node>_<param>, in one undo step. No node is added to the canvas. - Colors: red is a key on this frame, pink is animated with no key here, yellow is driven by a Control node or a connection. The field shows the value on the current frame.
- Editing: dragging a keyed slider updates the groom live; letting go is the edit. With Auto Key on, an edit sets a key. Otherwise the value holds until the time changes, as in Maya.
- Curves: the keys are ordinary Maya animation. Edit them in the Graph Editor or Dope Sheet (Select Attribute selects the groom with the attribute picked).
- Vectors and colors key as three channels (X Y Z, or R G B on a color attribute).
A Switch's
indexgets stepped keys. - Delete Key removes the key on this frame. Remove Animation deletes the keys and keeps the value now as the parameter's own.
- Not keyable: parameters that set how many strands, points or cards there are, or where they go: densities, counts, segments, seeds. Those must stay the same on every frame for motion blur, Alembic and Unreal groom caches. Set Key is greyed out and says why.
- Presets and Copy Graph keep the link; the keys stay with the groom that has them.
- Renders and exports read the keyed values on every frame, farm renders too.
groomlab.set_param_key(groom, "clump", "strength", value=0.2, time=1)
groomlab.set_param_key(groom, "clump", "strength", value=0.9, time=24)
groomlab.remove_param_animation(groom, "clump", "strength")
Reuse
- Compounds: select nodes and press Ctrl+G (or right-click > Group Selection into Compound), then expose the parameters that matter. To see and edit a compound's nodes, right-click it > Ungroup Compound, press Ctrl+Shift+G, or use the button in its panel; Ctrl+Z groups them again. Grouping anew starts with no exposed parameters.
- Presets: the Presets menu holds looks and small graphs that each teach one idea (blending looks, layers, maps, expressions, motion...), by category; Save as Preset... saves the graph with its compounds. Presets fit the scalp they are applied to. See Presets.
- Copy Graph to Other Grooms... (Utilities) puts one look on many grooms.
- Copy Graph and Paste Graph (in the Presets menu and the ... menu) share a
whole look as text: post it in a chat or a forum, or save it as a
.jsonfile. The text is a preset with the groom's control values.- Paste Graph replaces the groom's graph with the clipboard's, fitted to this scalp, in one undo step. The control values come along; keys do not.
- The status bar lists what the look reads that this groom lacks: painted maps, color sets, files, meshes, colliders, guide groups and parts. Nodes reading them use their defaults until you paint or add them.
- Text that is not a GroomLab graph is refused there, and nothing changes. The text is only read as data, never run; paths to other machines are left out.
Ranges, versions and notes
Every number param has a slider range, and hard limits where a value past them means nothing (a 0-1 share, a count); typing past the slider widens it, up to the limits. A node that does nothing as it is set (a Clump with no centers, a Flow with no arrows, a HairColor with a tip color but no tip amount, an Instance whose mesh is missing) shows a grey i badge and a line in its parameters saying why. Saved grooms keep every param and each node's version, so updates never change a saved look.
Renamed params
| Node | Was | Now | Why |
|---|---|---|---|
| Simulate | stiffness | stretchStiffness | it keeps segment lengths; bend and twist are the other stiffnesses |
| Jiggle | stiffness | frequency | it is the swing's frequency in Hz |
| Length | length | factor | a scale factor (or kept fraction in cut mode), not a length |
| Interpolate | radius | limitDistance | how far guides reach, not a size |
| Clump | radius | lockRadius | the lock's thickness, beside repelRadius |
| Flyaway | lift | liftAmount | a 0-1 share; Lift's angle and Flow's, Propagate's and Instance's lift are degrees |
| HairColor | tipBlend, downBlend | tipAmount, downAmount | amounts, as bandAmount and patternAmount |
| Curve | smooth, linear (bools) | interpolation: smooth, ease, linear | one choice instead of two switches (ease was smooth) |
| HairColor | (clumpId read by name) | clumpChannel | the channel clumpVariation reads, as Curl's and Cards' channel |
Kept on purpose: Gravity's stiffness (bend stiffness, described so); randomness for a 0-1 random
spread (Curl, Length, Width, Scatter); HairColor's *Variation family (random offsets of a color
component, not 0-1 spreads); *Jitter for positional and angular jitters. Map, Expression and
FieldNoise min/max are output ranges (what 0 and 1 become); Control's min/max are only its
slider's range.